How To Install Hand-Painted Decorative Ceilings
How To Install Hand-Painted Decorative Ceilings .pdf
How to Order Hand-Painted Decorative Ceilings
Standard Faux Finishes for Hand-Painted Decorative Ceilings
E-mail us with any questions or concerns
Installing Hand-Painted Decorative Ceilings from Beaux-Arts Classic Products is both easy and gratifying. Adding a Hand-Painted Decorative Ceiling to any room adds volume and grandeur to that room. In most cases, installing a fully-painted Decorative Ceiling can be accomplished in an afternoon by two people. As for the tools required, you will most likely already have them or they can be purchased inexpensively at Home Depot or Lowe’s.
The required tools include:
- battery-powered screwdriver
- measuring tape
- straight edge
- caulking gun
- blue masking tape
- pencil
- chalk line (optional)
- string or laser level (optional)
Most rooms are easy to lay out. If you have a central chandelier or ceiling fan then the position of the center medallion is predetermined. If the room does not have a center light or fan feature, then the center medallion should be placed in the center of the room. The center of the room can easily be determined by holding the chalk line, string or laser level in one corner and lead the other end of the chalk line, string or laser light to the diagonally opposed corner. Avoid the temptation of using chalk or heavy pencil marks on the ceiling, as they are difficult to clean up or erase. Instead, use some of the blue masking tape to mark the line in the center. Switch to the adjacent corner and repeat the process. Where the two chalk lines, string or laser lines intersect is the exact center of the room. Mark the center with a small light pencil.
Now look at how and where the corners should be located without creating location issues with heating grilles, recessed lights, sprinkler heads or other items possibly found on your ceiling. If there is nothing interfering with the location of the corner pieces, then try locating the outside edge of the decorative corners one to two feet from the corners of the room. Inset these corner pieces one foot from the corners for small rooms and two feet for larger rooms. Very large rooms may look best with a three-foot inset for the corners. Anyway determine where the corners are best located and put a small pencil mark in each corner an equal distance from each wall.
Then stretch the chalk line or string or line up the laser light from one corner to the other. Depending on the style of molding that you selected you may be able to use the chalk line or pencil to mark it, but my recommendation is only mark two sides first. Then install the first corner and the molding from that corner to the next two corners. This is recommended because, depending on the type of molding used, it may end up slightly short or long by an inch or two. Therefore some slight adjustments to the final location of the other corners may be necessary. So let’s discuss how to install that first decorative corner, then we will tell you how to put up the molding on the two chalk or pencil lines emanating from the first corner.
Each decorative corner and the central medallion have a few pre-drilled screw holes in them. If you can’t locate them by looking at the front of the first corner piece, that is good, because we try to put them in places where they are difficult to see, like deep crevices. If you chose to cover your screws with cabochons or nail heads your holes will be in places appropriate for their use. However, you can simply turn over the corner piece and see where the screw holes pierce through. Twist a drywall screw into each hole by hand just to hold it in place, making sure that they don’t poke out the back which will scratch the ceiling. Now one member of the installation team should hold up the Decorative Medallion while the other member assists in lining up the corner with the two chalk or pencil lines. Notice that there is a precise point where the molding looks best projecting out from the corner. Some styles of ceilings are more free form than others and some have predetermined junction points with the molding. So you will have to line up the corner and mark with tape prior to adding the adhesive to the back of the decorative corners.
Once you apply the adhesive you definitely don’t want to move the corner much because you may smear glue over exposed parts of the ceiling. So take the time to line up the first corner and mark reference points with tape or pencil to help you guide the piece into the proper place. Now when you are ready, load the special space age adhesive that we provide for your caulk gun and cut the tip off with a knife or scissors. Pump the caulk gun so that plenty of adhesive goes onto the back of the decorative corner. Avoid getting too close to the edges (try 2″ from any edge) because the caulk will spread when you apply upward pressure to secure the corner to the ceiling. Then slowly and carefully guide the corner piece to those guide marks you predetermined and once you are sure you are in just the right place, push the corner upward to the ceiling.
Apply lots of pressure, while the other member of the installation team uses the battery-powered screw driver to screw those drywall screws into the drywall. Do not over tighten these screws as most will just go into drywall alone and over tightening will actually strip out the drywall around the screws. The concept of these screws is to hold the Decorative Corner in place while the adhesive dries. If any adhesive squeezed out from the edge, don’t touch it yet, wait until it dries overnight and it will easily peel off without any mess or difficulty. If you have lots of adhesive squeeze out, then reduce the amount you put close to the edges on the remaining corners.
Cabochons
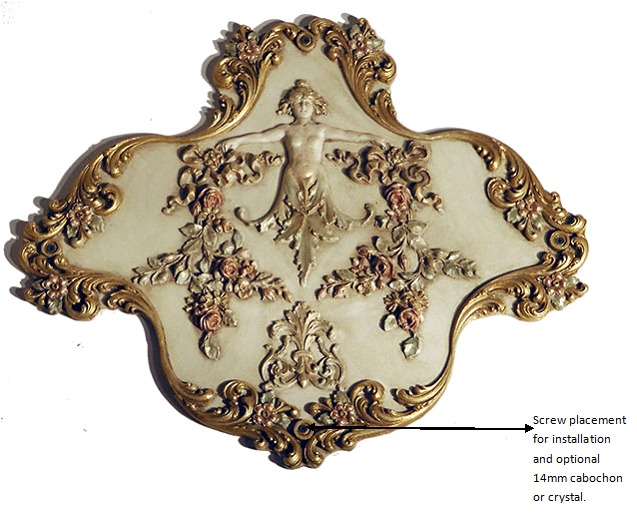
Your Hand-Painted Ornamentation will come pre-drilled for easy installation. The screw holes can be strategically placed so you can cover the screw heads with a decorative cabochon. Please advise us when you place your order if you would like to use a decorative cabochon. Otherwise, you can paint the screw heads to compliment the finish you have selected.
These Louis XV corners demonstrate the use of cabochons to compliment the ornamentation design while camouflaging where the screws were placed. Used appropriately, it is elegant and light catching.
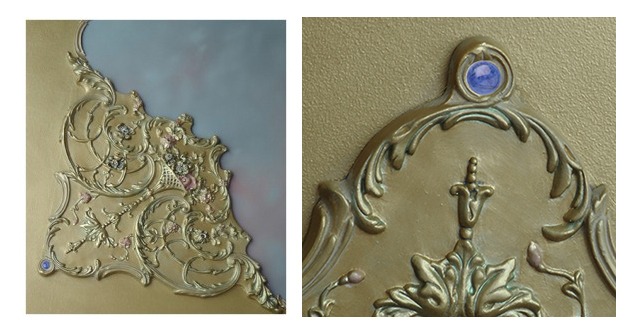 |
We offer natural gemstones, Swarovski crystals and historical nailheads as a decorative option for your screw heads. This Louis XV Side Ornament is shown with Sworovski crystals in aurora borealis. Very subtle but light catching and unexpected.
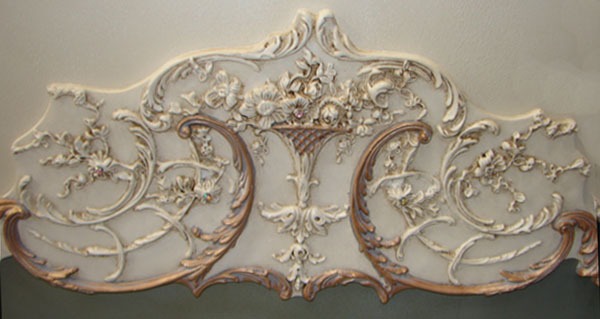
Our Florentine Corner was designed with a cabochon setting. Of course it look good without but amazing with a cabochon.